Month: September 2020

Computers 9 Tiger button hold the tiger!

Hey Computer Wizards!

Here are the steps to make a button.

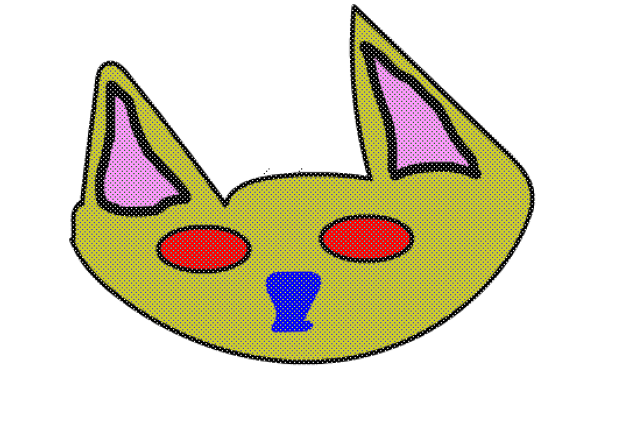
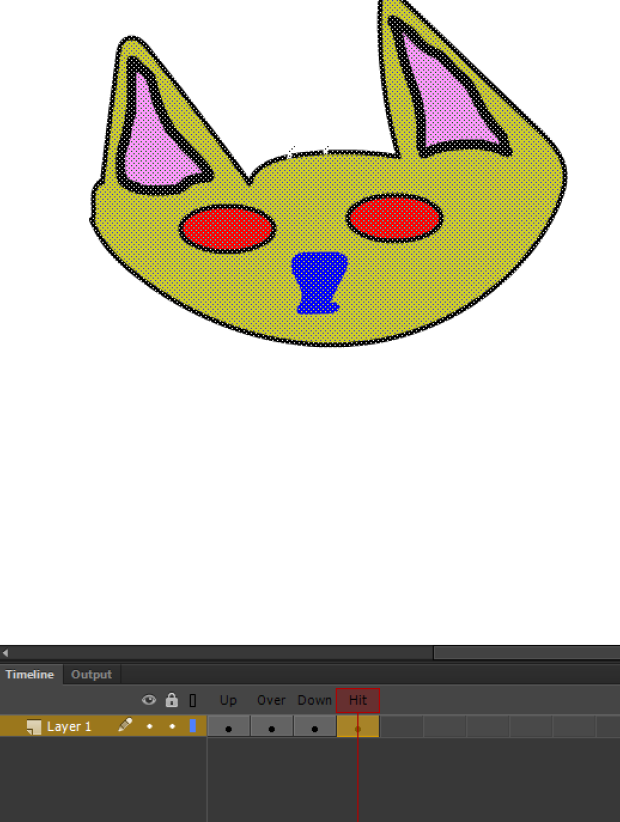
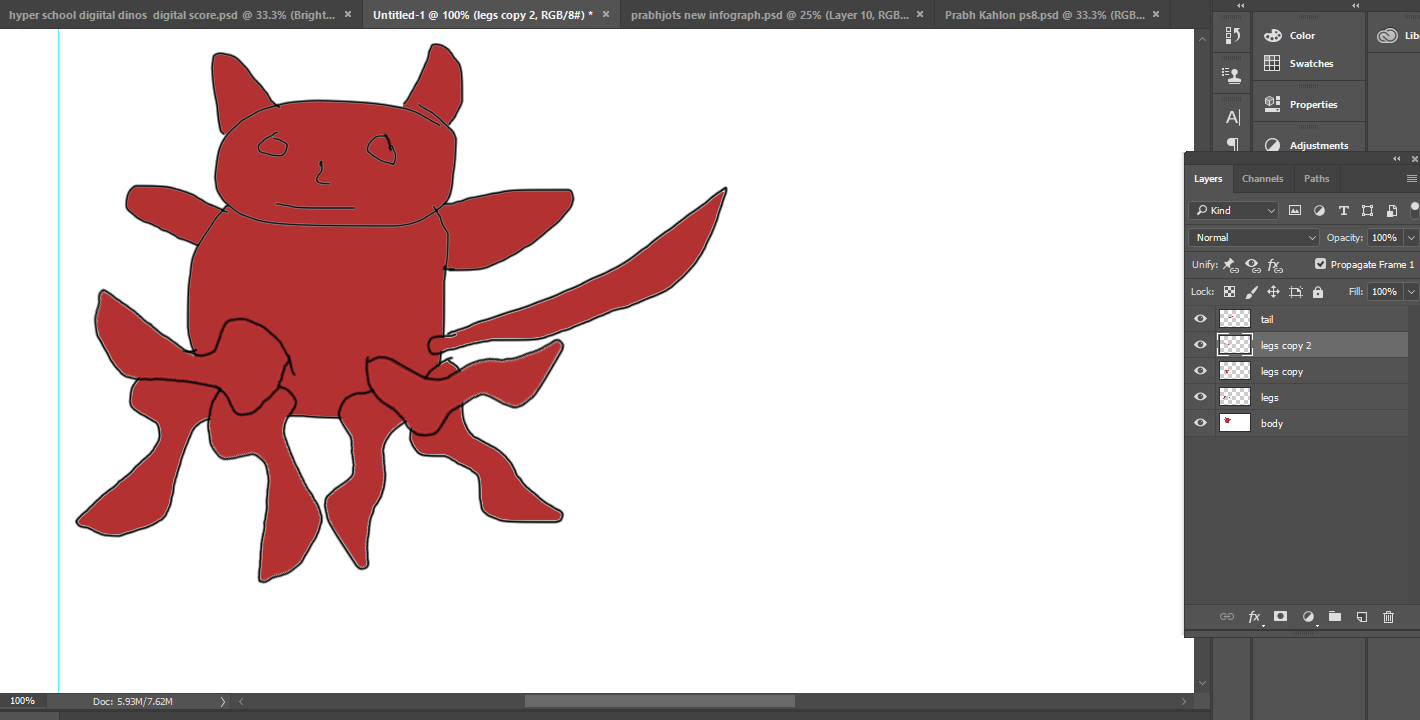
1: Draw something, even just a shape or scribble. Here is the best cat head I can draw with my tablets touchpad. Your animal will be better, I know.

b1

2: Next, select the thing you drew.

b2

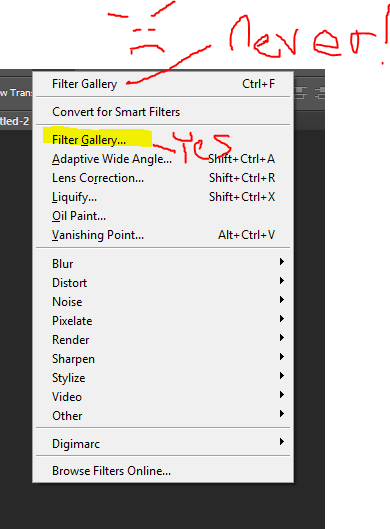
3: Then right click on it and choose convert to symbol (or push f8 on the top of the keyboard).

b3.PNG

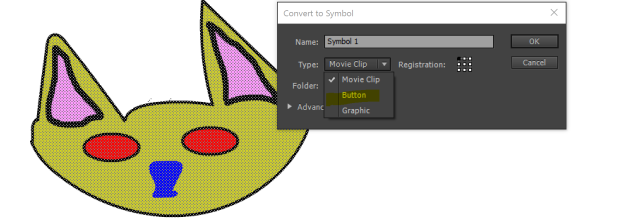
4:  Since we are making a button, select button and then press ok. The animal face will suddenly have a blue box around it to let you know that it is a symbol.

b4

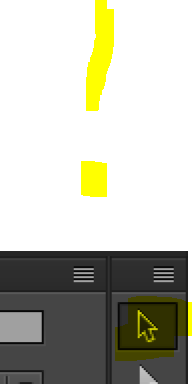
5: Cool huh? Then we use the selection tool (the black arrow of chooseyness)…

b5

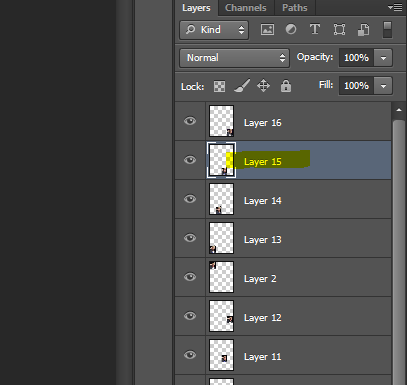
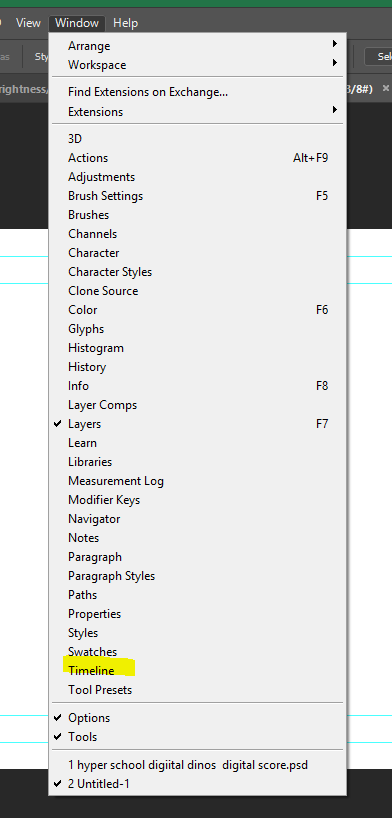
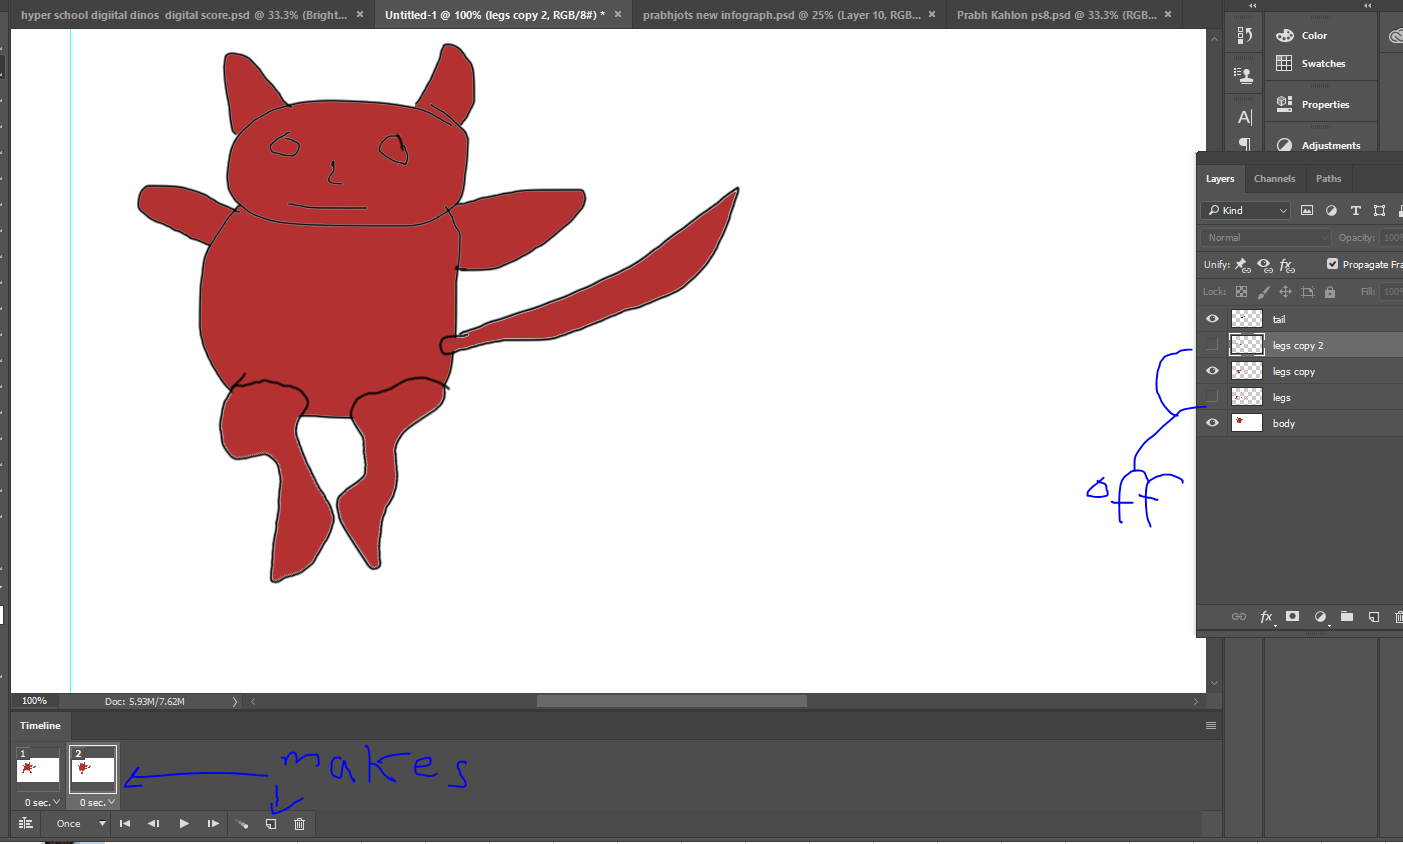
6: And then double click on the animal face to bring up the button’s special timeline.

b6.PNG

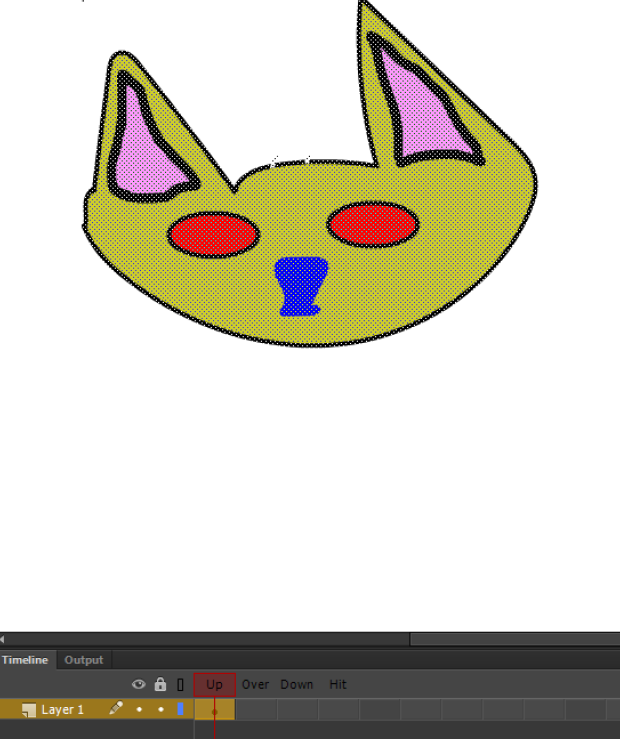
7: You can see there are four parts, Up Over Down and Hit. Up is when the cursor is not touching the button, Over is when the cursor is over the button (go figure), Down is when the user clicks the button, and Hit is the part of the screen that is the clickable part of the button. Right now three of the parts are empty, so fix this by pressing f6 at the top of your keyboard three times.

b7.PNG

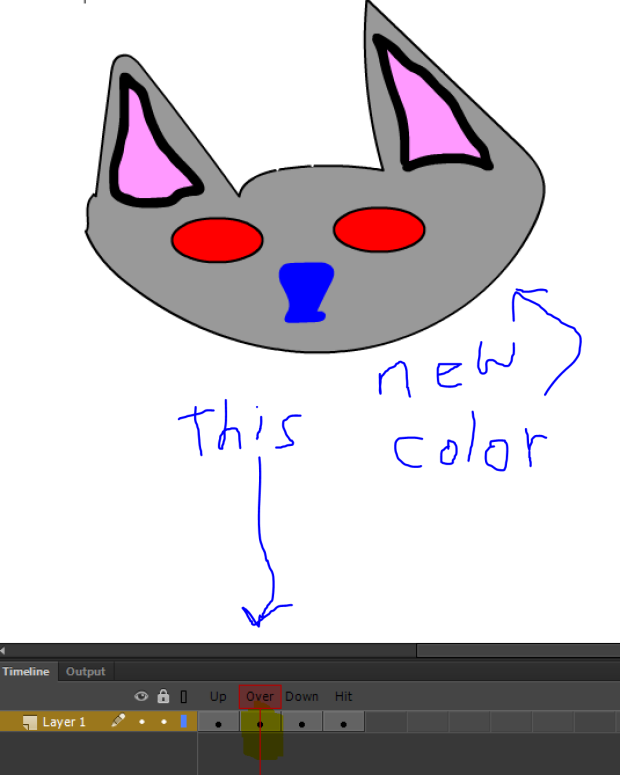
8: Perfect! (if your screen looks like mine, with a keyframe [black circle] under each word. Now it’s time to click the over frame of the timeline and change the main color of the animal face or button. That is good design because then the user knows when they are over the button.

b8

9: Then click on the down frame and change up your animal face a bunch of ways, or even erase it and draw or write something different.

b9

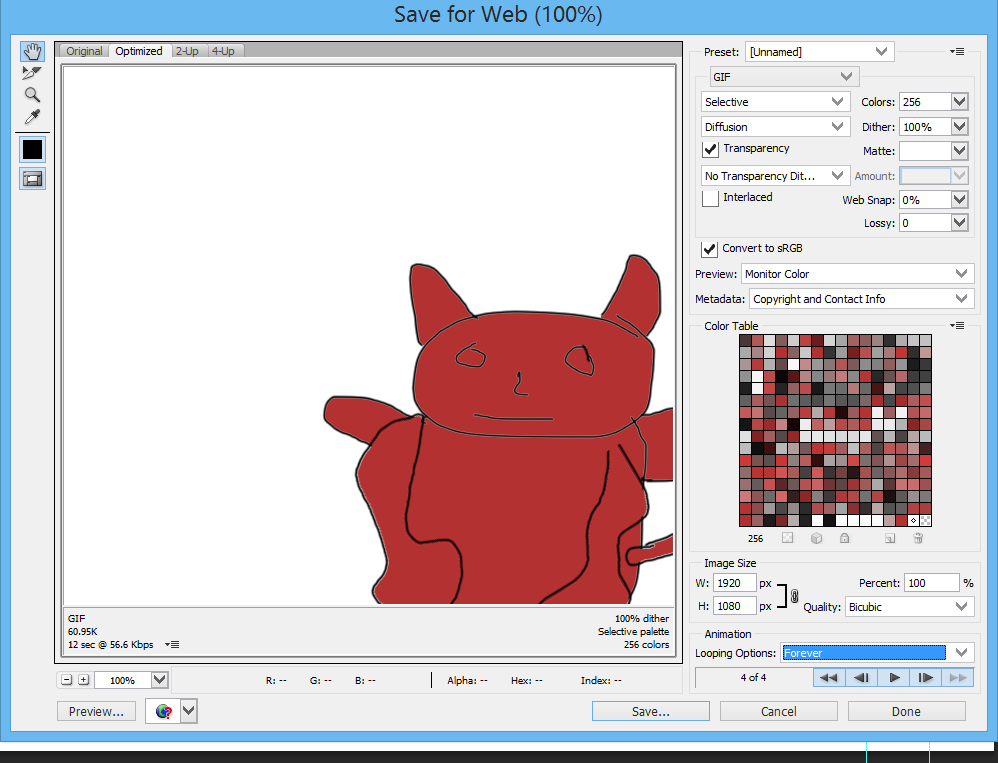
10: Now test out your button by pushing crtl+enter and then moving the mouse pointer over the  button and seeing if it changes color. If it does, click it and hold the button down to see your changes.

To make a movie clip, you follow the same steps from 1 to 3 , but at step 4, choose movie clip instead.

mc3.PNG

Then when you click ok, you will have a movie clip instead. When click on it with the selection button (black arrow), you will get another timeline. That timelime will animate your creation independently of the main timeline.

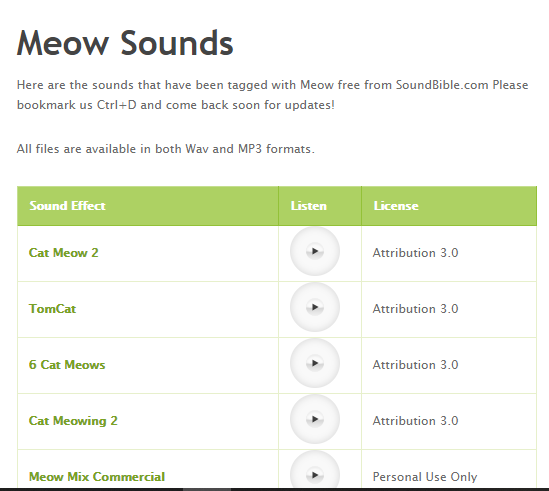
You can add sounds from sites like soundbible.com.

Go there and search for a sound. Here are some of the results for a search for Meow.

sound 1

Then you click on a sound file that you like and you will get something that looks like this:

sound 2

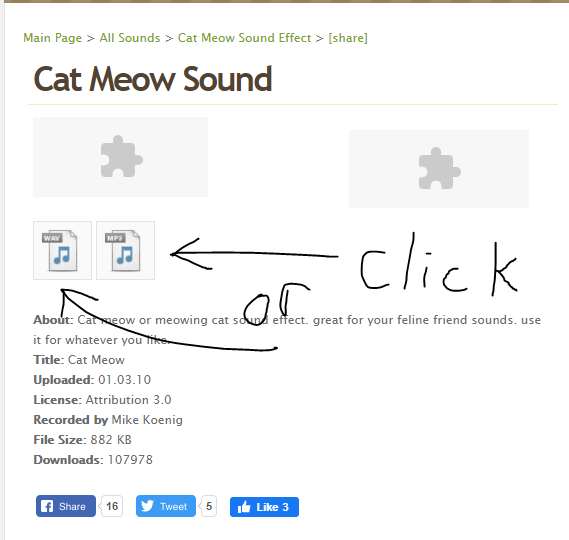
Click on the musical notes to download the sound. Save it to your documents or your pictures.

sound 3

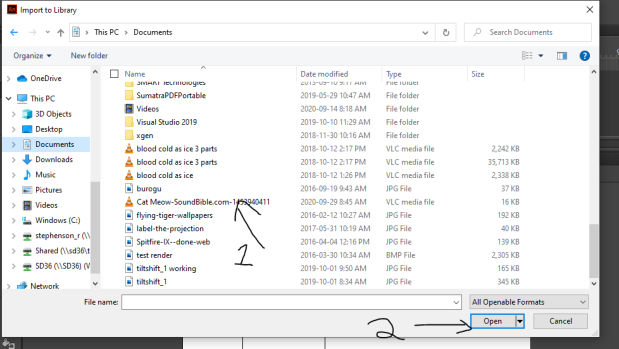
Click on File > Import> Import to Library then show flash where you saved the file.

sound 4

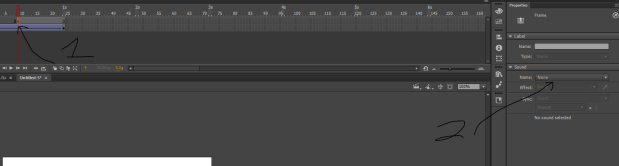
Then click on a keyframe where you want the sound in the movie, and click on the word none, under sound in the right hand side.

sound 5

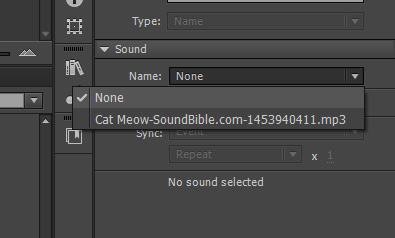
Then change none to the name of your sound.

sound 6

Now the sound will play at that point in the movie. Make sure your sound is not too long, or it will sound strange.

Using the skills learned to make a button, a movie clip, and add sounds to flash you will make a button like my tiger button but without using a tiger.

It needs: a button

2 sounds that fit one for over, one for down

LOLCat2 floaties

Computers 9 : Two scenes!

This is a pretty easy assignment. All you need to do is learn how to insert a scene, and how to switch between them, then draw out two scenes that look nice. 

You need one character that is in both scenes. 

The first scene can be 3 seconds long, and the 2nd scene 4 seconds long. 

You should have two moving things in the first scene, and 3 moving things in the second. 


Computers 8: Filter Gallery project

Find a famous person who is famous for something more than  being on Instafacepost.

Like this fellow:


1.PNG

We will crop the picture so it’s head and shoulders.

2


3.PNG

Press enter to complete the crop.

Make a document using the U.S. Paper preset, it’s under print, then letter (I think).

4.PNG

Copy and paste your person in to the new document.

Use Transform>Scale to make the picture smaller. We need to fit 16 of them on here.

5

Then we are going to click on filter and then liquify.

6

Click on the poking finger in the top left, then click on parts of the face to change how it looks in a fun way.

7

I liquified the eyes, mouth and hair.

8

When it looks cool, click the ok button.

9

Now use the Marque selection tool and make a box around the picture.

10

Choose Edit> Copy (or Ctrl +C)

11

And then Edit>Paste (or Ctrl + V)

12

This will give you another layer with the same picture on it. Move it to the top left corner, and then click on the other layer and move the other picture beside it.

Keep repeating copy and paste, and keep adding  more picture, each with it’s own layer.

13.PNG

Stop when you have 16. Now crop out any empty space with the crop tool (naturally).

15

Click on the layer at the top or bottom and then click Filter>Filter Gallery

16

Choose a filter and adjust the sliders until you like the look of it, then click ok.

17.PNG

Click on another layer.

18

Repeat the steps with Filter>Filter Gallery (make sure it’s the lowest one)

this one

If you click the one I labelled never, you will just repeat the last filter you used. You want to choose a different filter for each copy of the picture.

19

Keep going until all 16 copies of your picture have a cool and different filter.

Hand it in as yourname_filter

Computers 9 10 Ocelot : animated gif, (like the peanut butter)

Hi,

jif

This project has you designing a gif. Your gif is going to be something with a theme I will tell you about. You will need 6 elements (things that change or move) and a background, and  2 things of the things should change. One of your elements should be text,

You will need at least 10 frames.

You need to know: how to use filters, how to make a gif, how to use layers (turning them on and off, merging layers), how to make something new out of different parts.

Step 1: Figure out what cool thing the gif will show. You will need things that move or change and a background and text. These are the elements of your gif.

hyperschool-score-not-digital-not-blinking.gif

You need to figure out an interesting idle pattern for it to follow.  The example above Hyperschool has the dino and rider moving in a circle. 1: Facing middle, 2: rearing up in the air (middle facing) 3: rearing up outside facing, 4: facing outward. The pattern is mirrored with another character. The other parts of the idle pattern are spelling out the name of the game in words and individual letters, and the insert coin and high scores for player one and two.

To make that animation I have 28 separate layers and 27 different frames.

Here’s another gif example, with the theme talking wall.

trump-gif-wall-perfect-I-think.gif

I will show you how to make a simple gif here, and the technique is the same for more complicated gifs, you just follow the steps over and over.

To make a gif: Create a new document in photoshop. Click New> Film & Video> HDTV 1080p.

hdtv

Then you need to turn on the timeline in photoshop. Click Window at the top and move down to  Timeline and click it.

timeline

Click the  arrow next to the words Create Video Timeline and change it to Create Frame Animation, then click on Create Frame Animation.

fram

A box will appear at the bottom of photoshop that looks like this: Click the new frame button to make a new frame, play tests it, and click on time to change the time between frames.

explain

I made a very simple character with 3 different leg position layers to start off with. There is also a head and body layer and a tail layer.

simple chara

Then I use the eyeball button on two of the leg layers to make them invisible.

first.PNG

This is the position for the first frame.

Then I click the new frame button on the time line and turn off the legs layer and turn on the legs copy layer.

frame 2

Then I click the new frame button on the time line and turn off the legs copy  layer and turn on the legs copy 2 layer.

frame 3.PNG

By following these steps you can create a gif. You just add a new frame, turn on or off layers (or add new layers) until the animation is finished.

Make sure your gif has:

a multiple step animation (at least 10 frames),at least 7 elements including a background and text, and any other cool things you can think of.

Then you do the steps to finalize the gif, which I will show you here:

1: Find the save for web option. Photoshop moved it somewhere else in creative cloud, but I think that it is under File>Export>Save for web. I might be wrong about where it is hiding though, but it is definitely still under file somewhere. (File>Legacy>save for web ??)Poke around ’till you find it, and then let everyone else know where it is.

OR: just press ctrl + alt + shift + s all at the same time.

2. Choose save for web once it is located.

3. A big box thing will appear. We only want to change one  thing: the loop option from once to forever.

one thing to change

Change it to forever.

changed!.PNG

Then click Save….

Another window pops up and you type a good file name for the gif, like your name gifaroonie or something like that and then choose save again.

really done

It will export the gif and then when you find and click on it, it should open in an internet browser (probably chrome) and show off your gif.

Hand the gif in, as well as your photoshop psd file.

Happy-Halloween-longer-Mr

Computers 9 September 21

What’s due so far:

Hi, so this is just a list of the assignments due so far:

A paint picture of an animal,

A presentation about you, 14 Q answered

3 new emojis, past present future

3 picharts

4 bar graphs

And now you should be working on 3 charts of your choice (not bar graphs or pi charts) with 8 things on them.

Computers 8: Monster Beach party

Monster Beach Party

We are going to make a photo-composite (a photo made up of other photos) that shows some monsters on a beach where people were having a party. There is a list of everything you need for the project at the bottom of this post.

Use Magic eraser,  magnetic lasso, Scale and transform, Copy and paste.

Remember, to open a picture you click file open and then go to where you saved the picture.

beach 1

nice beach

Use the magnetic lasso (or the magic eraser if it’s got a background that is the same color, then just use the marquee tool to put a box around it) to get just the thing you want to copy in to the beach.

us magnetic lasso.PNG

click Edit, Copy.

copy.PNG

Go to the beach picture tab and click Edit>Paste.

paste.PNG

If it is the wrong size (too big or small), click Edit>Transform>Scale

scale.PNG

Move the edges of the box until it’s the right size and then press Enter on the keyboard.

If there are any extra parts to the picture that don’t look right, use the background eraser to clean it up.

bckground eraser to clean up

Remember, every time you paste something, you make another layer. Check the layer you are working on, to make sure what you are doing. You can use the move tool to change layers quickly by clicking on the item you want to change. The move tool looks like a four way arrow, at the very top of the tool bar.


You need:

A deserted beach (no people, no manmade things on it)

2 monsters or more

Some scared people (at least two)

4 beach toys

Some food

Some drinks

Some beach sports equipment

A cameraperson

A source of music

Put them all together, so it looks natural. Make sure you can see the monsters and people just as you would if you were there. If we can’t see someone’s feet for example, make sure that there  is a reason why we can’t. Don’t put people floating in the air.

Introduction to Photoshop


Then when Photosho opens you will see this:

open

Then click Create New


open 2

Then you can choose a size. I like web standard.

open 3

open 4

open 5

Now a canvas (place to create) opens up, and you can see the tool bar.

This page has an excellent summary of the tools and what they do:

https://www.photoshopessentials.com/basics/photoshop-tools-toolbar-overview/

To open a downloaded file, choose file> Open> go to the place you saved the file.

Computers 9: Emo Emo Emoji times

Hello,

Today you are going to join the ranks of the people who change the world!

You will make 3 new emojis: one for the Future, one for Now, and one for the Past.

To test if your emoji exists already, do a search on duckduckgo (if you care about your privacy) or google (if you don’t).

You can also check

https://emojipedia.org/

Remember that an emoji is a simple version of the thing it represents. You don’t want to draw something really complicated, but people have to be able to tell what it is right away.

Keep your drawing as simple as possible, but make sure that no one will mistake it for anything else.

Computers 8 First assignment: About you!

Hi, You are going to make a powerpoint presentation that has 14 things about you!

Write your questions in word, the answers in powerpoint! Use images!

You can use the questions I asked about me, just change the ones that don’t fit. You probably are not married, for example, and you are not a teacher in the school.

Q1: Who is the tallest teacher in the school?

Q2: Where was Mr. S born?

Q3: Where was Mr. S’s dad born?

Q4: Where was Mr. S’s wife born?

Q5: What pets does Mr. S have?

Q6: What languages does Mr. S speak (3)?

Q7: How tall is Mr. S?

Q8: What are Mr. S’s hobbies?

Q9: What is Mr. S’s favourite PS4 game?

Q10: What was the last book Mr. S read?

Q11: What is one Mr. S’s favourite PC games?

Q12: Where can we see assignments for Mr. S’s class usually?

WELCOME TO YOUR COMPUTERS 8 ROTATION

Hi, welcome to the Computers 8 rotation. This year will be different from the usual, but it should still be fun. You will have this class every other day.

That means you might have this class on Monday, Wednesday and Friday one week, and then Tuesday and Thursday the next.

We will be learning things like: making cool images with Photoshop, image manipulation, level design for video games, making 2d animations, and more.

Here is a course outline:

Please always wear your mask in our class. It will reduce the chance that you or someone else will get sick.

Please remember to socially distance yourself from your teacher.

Here is a powerpoint about this school year.

Download the powerpoint and check it out.

For today, please login to the computer and collect 5 pictures that relate to what you did on your summer vacation.