Month: February 2017

Computers 19 uses Fire Effect, it’s super effective!


Hey everypony!

great_pony_of_fire_by_macgrubor-d6nxeki

For our next photoshop project, I would like you to use photoshop to set something on fire digitally, that was not actually on fire.

I have a tutorial that I found on the net that is pretty cool, but it is a bit vague. It tells you to do stuff that you probably know how to do, but without saying how to do it step by step.

I don’t want you to think that Computers is a hard class, just that you should work hard in class if you want a good mark, so I am not going to make everyone do that tutorial.

If you want to try and do the tutorial I like, here it is: this

You should use a different picture than the one in the tutorial though.

If you try it out and it’s too confusing, stop doing it (on the first day) and find your own fire in photoshop tutorial and follow it, just use a different picture than the one in the tutorial.

If you can’t find one that is good and easy try this one:

But use something that is not a guitar!

When you hand in your finished document, give me three things: 1, the original picture, 2, the picture modified so it looks like it’s burning, 3, a word document with the website you got the tutorial from.

Okay?

Cool! I mean hot, ‘cuz we are playing with (digital only please) fire.
Computers 19 Chimeras down to the skeletons

We are going to create a monsterous hybrid that looks natural. Pay close attention to the way the pieces fit together. Imagine how the bones are connected. You will use 7 different animal skeletal pieces (so not just eyes but a skull) and put them together so they look like they fit. You will assemble them on a new background like an empty beach or forest clearing or mountain valley etc. Then you will find the bones for each piece and have them come together in a gif.

When you find a piece, make sure you find the corresponding bones.

Your gif should have the bones appear one by one starting from the head or the tail and continuing on in order.


Bonus Challenge: Could you make a gif where first the bones pull themselves together and then muscles appear and finally the skin and hair appear?


Computers 19 Infographic IV

You are going to make an infographic about yourself or one of your hobbies. You will need to give information in text and graphics about it. You will need to have something that you can give us at least 8 different bits of information about. Today you need to decide your topic and what those 8 things are going to be, then you need to design icons for them. Sometimes, there already will be an icon that fits, you can just draw your own version of it. Other times you will have to make an icon for it.

Infographic :  Steps:

  1. Decide on your topic. Choose something that interests you and has numbers and visuals. You will need a subject that can have at least 8 different sections.

2.Come up with a list of items that you want to show in your infographic.

  1. Make a new document in photoshop: 6.25” x 8.25” with 300 dpi
  2. Work down your list, linking the layers that are for each item, so if you move them around they go together.
  3. Make an icon for each item on your list.
  4. Type the text for each item.
  5. link the layers of each item and text that relate to the topic together.
  6. When you are done with all the items, move them around on the document until they look cool. Don’t make it look in too much of a grid shape.
  7. Add lines to separate items where needed.
  8. Save the image with a different name, like infographic yourname original.
  9. Save the image with another name like infographic yourname merge.

12.With infographic yourname merge ONLY,  Merge down all the layers to make them one. Don’t do this step with the other file, that way you can change stuff around if you need to later.

  1. Find a background image that is colorful and matches the topic of the inforgraphic.

Source: http://thepicinicbasket.blogspot.ca/2014/05/how-to-make-infographic-using-photoshop.htm

Drafting 8: Orthographic Projection

Finish your spaceships and Castles, then start orthographic projection.

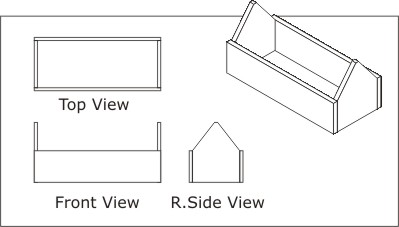
Read the pdf below called projections and views, then draw the shape below in autocad

projections and views

u2s3l2f-26

Next complete these exercises by saving the files and opening them in paint. Write the correct letter for each view.

Choose 2 shapes from exercise 4 (above) and draw their othographic views in autocad. Label the views and the shapes you choose to draw.

Computers 19 Jan 31

NEWS FROM THE FUTURE!

Hi, from the future.
You have been selected to create a vision of the future.
You will decide if the world is better in ten years:utopia

or worse in ten years:

dystopia

What kind of news will people be interested in the future? What kind of sports and sports heros will be around? What will the weather report look like?

Use a U.S. paper preset for the size and make up the front page of the Vancouver Sun from ten years in the future.

Recreate the paper you see below with stories from the future, don’t forget future ads and future weather: Have at least 3 stories with 2 paragraphs for each one (six sentences), if you have four stories you don’t have to do the table of contents.


ca_vancouver_sun-750

newspaper-cats